Sardine Bruschetta with Roasted Tomato and Red Pepper Sauce

When you mention bruschetta, most people tend to picture grilled bread topped with tomato and basil. While tomato and basil topping is a popular and familiar choice, you need only grill bread rubbed with garlic and drizzled with olive oil and seasoned with salt to be bruschetta.

Bruschetta can trace its origins back to Ancient Rome, where olive growers sampled their freshly pressed oil using a slice of bread. Bruschetta, we are more familiar with today, started being made around 15th Century Italy.

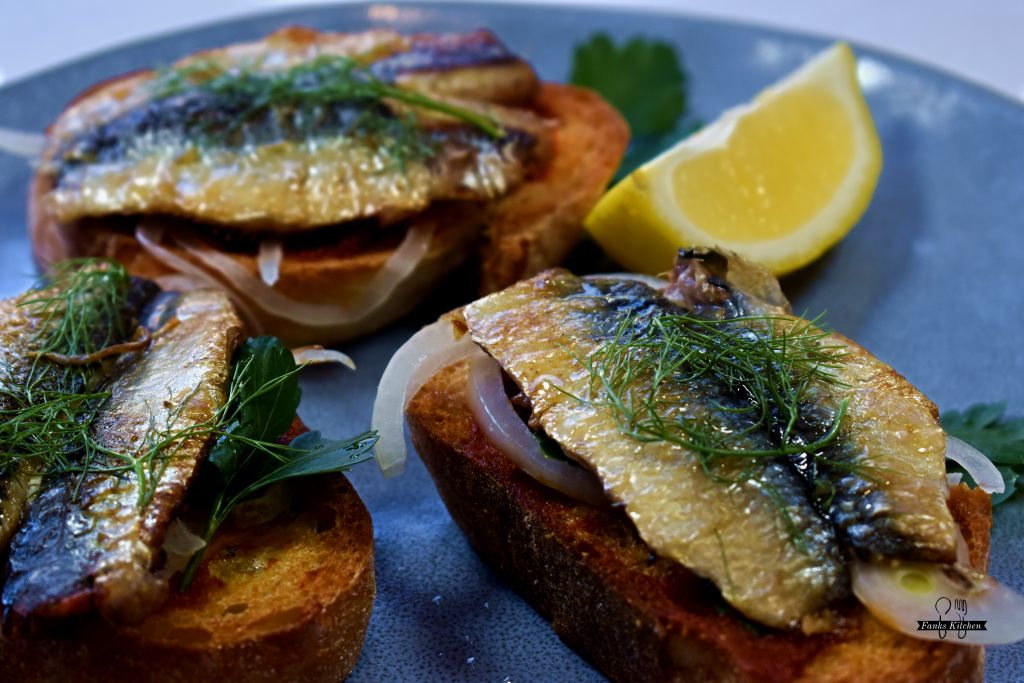
Bruschetta makes for a delicious light dish that can be packed with flavour. So for something a little less traditional, try this Sardine Bruschetta with Roasted Tomato and Red Pepper Sauce.

Construction

1. Cut slices if Sourdough, drizzle with Garlic Infused Olive Oil and season with salt. Lightly toast under grill.

2. Spread toasted Sourdough with Roasted Tomato and Red Pepper Sauce (recipe below.)

3. Add thinly sliced white onion and continental parsley.

4. Top with Grilled Sardines (recipe below.)

5. Spritz with fresh lemon juice.
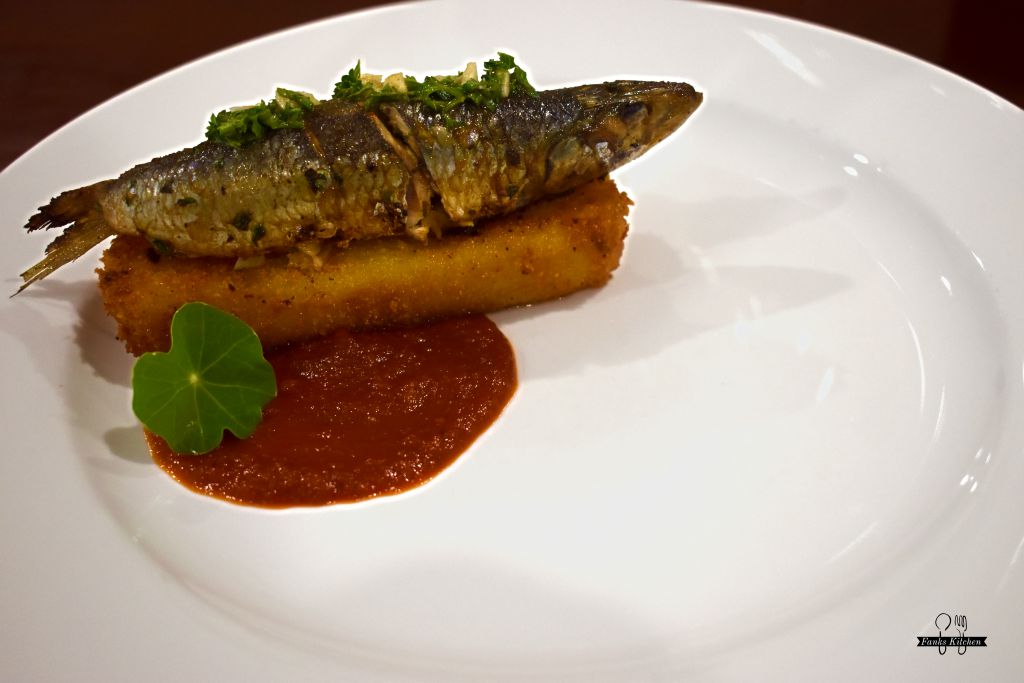
Sardines

Ingredients
  • 6 Fresh Sardines
  • ¼ Cup of Parsley (finely chopped)
  • 2 Cloves of Garlic (minced)
  • ½ Cup Olive Oil
  • 1 tsp Paprika
  • 1 Lemon (Juiced)
Method

1. Gut and debone fresh Sardines

2. Combine, olive oil, lemon juice, minced garlic, chopped parsley and paprika, to form a marinade. Place prepared Sardines in marinade and rest for 30 minutes.

3. Grill Stuffed Sardines, approx 2 – 3 minutes each side.

Roasted Tomato and Red Pepper Sauce

  • 1 doz Vine Ripened Tomatoes
  • 1 Red Capsicum
  • 6 Cloves Garlic
  • 1 Red Chilli
  • 1tbsp Sherry Vinegar
  • 1tbsp Paprika
  • 1 Lemon (Juiced)
Method

1. Blanch Tomatoes and peel.

2. Place Tomatoes in baking dish, drizzle with olive oil and season with salt and black pepper. Add cloves to dish unpeeled. Place in 180 degree C. oven for approx 30 minutes.

3. Rub Capsicum with olive oil and roast over open flame until blackened. Allow to cool and peel.

4. Add roasted tomatoes, capsicum, and peeled garlic, and finely chopped chill to food processor.

5. Place processed mixture to saucepan, add vinegar, paprika and lemon juice. Bring to simmer over low heat and allow to reduce to about half, regularly stirring to ensure does not stick.

6. Force mixture through mesh sieve with spatula.

7. Return sieved mixture to saucepan and reduce over low heat until puree consistency.

Advertisement

Who thought you could make Sardines Fine Dining?

Ahhh…the poor humble Sardine. Sardines are an acquired taste with a strong flavor and smell, and most people’s experience with sardines is limited to tinned sardines from the supermarket. Indeed, tinned sardines, dripping with oil, is my earliest experience, and my mother would sometimes give us mashed sardines on toast for lunch on the weekend. Fresh Sardines are not nearly as strong and worth putting your preconceived biases aside and having another try.

Named after the island of Sardinia, where Sardines are readily available, these fish are most often found in Mediterranean cuisine, particularly Spanish and Italian. Sardines are often presented with tomato in Spanish-style cuisine, while in southern Italy, Sardines are popular with pasta. One of Venice’s most iconic dishes is ‘Sarde Saor,’ essentially Sardines with vinegar and onion. Because of the history, Sarde Saor was a dish I made a point of finding when I visited Venice some years ago, and it changed my perception of Sardines.

Sardines are inexpensive and good for you, being high in Omega-3 and fatty acids.

Sardines are not something you will typically find on fine dining menus, so I thought I’d set myself the challenge of making a dish with Sardines a little more upmarket. In creating this dish, I have drawn on Spanish influences. Enjoy!

Stuffed Sardines

Ingredients
  • 6 Fresh Sardines
  • ¼ Cup of Parsley (finely chopped)
  • 2 Cloves of Garlic (minced)
  • ½ Cup Olive Oil
  • 1 tsp Paprika
  • 1 Lemon (Juiced)
  • ½ Onion (fine dice)
  • ½ Cup of Raisins (fine dice)
  • ½ Blanched Almonds (fine chopped)
  • ¼ Cup Breadcrumbs
  • 2 tbsp Sage (finely chopped)
  • 1 tsp Salt
  • 1 egg (beaten)
Method

1. Gut and debone fresh Sardines

2. Combine, olive oil, lemon juice, minced garlic, chopped parsley and paprika, to form a marinade. Place prepared Sardines in marinade and rest for 30 minutes.

3. Lighttly toast blanched almonds in a frying pan.

4. Saute onion in frying pan with a drizzle of olive oil. Once onions are translucent and beginning to caramelise, add raisins and sage.

5. Remove Onion, Raisins and sage mixture from pan and allow to cool. When cool combine toasted almonds, breadcrumbs, and egg to form a stuffing, season with salt and black pepper. Add more breadcrumbs as required if stuffing is to wet.

6. Fill Sardine cavity with stuffing. Allow to rest.

7. Grill Stuffed Sardines, approx 2 – 3 minutes each side.

Roasted Tomato and Red Pepper Sauce

  • 1 doz Vine Ripened Tomatoes
  • 1 Red Capsicum
  • 6 Cloves Garlic
  • 1 Red Chilli
  • 1tbsp Sherry Vinegar
  • 1tbsp Paprika
  • 1 Lemon (Juiced)
Method

1. Blanch Tomatoes and peel.

2. Place Tomatoes in baking dish, drizzle with olive oil and season with salt and black pepper. Add cloves to dish unpeeled. Place in 180 degree C. oven for approx 30 minutes.

3. Rub Capsicum with olive oil and roast over open flame until blackened. Allow to cool and peel.

4. Add roasted tomatoes, capsicum, and peeled garlic, and finely chopped chill to food processor.

5. Place processed mixture to saucepan, add vinegar, paprika and lemon juice. Bring to simmer over low heat and allow to reduce to about half, regularly stirring to ensure does not stick.

6. Force mixture through mesh sieve with spatula.

7. Return sieved mixture to saucepan and reduce over low heat until puree consistency.

Potato Croquette

Ingredients
  • 3 Large potato’s
  • 100g Butter
  • 1 egg
  • Panko Breadcrumbs
  • Flour
  • Salt and Black Pepper for seasoning
  • Vegetable Oil for frying
Method

1. Peel and dice potato and boil until tender. Drain, add butter and mash.

2. Place mashed potato’s in a square plastic container, and refrigerate to set.

3. Once potato has set, turn out onto board and cut into desired shape.

The Alchemy of turning Stock into Liquid Gold

Chicken Stock & Consomme’

A couple of days ago, I posted about saving money by breaking down chickens. Apart from having some lovely cuts of meat, you can use the leftover chicken frames to make stock. You can freeze the stock for later use or take it to the next level and make it into a consomme’.

I’ve been making my own stock for years, and sure, I will grab stock from the supermarket when I’m in a pinch, but it doesn’t have the same depth of flavour as what I make myself. The secret ingredient of a good stock is ‘patience.’ While stock doesn’t require much hands-on preparation time, it requires slow simmering for the best results, often for several hours. You may be tempted to boil the stock for a faster result, but your stock will end up very cloudy and less flavoursome.

Mastering how to make stock is a keystone to good cooking. It is a crucial ingredient to soups, classical sauces like Veloute’ and Espagnole, and demi-glace and jus. Growing up, the only brown sauce I knew was gravy; create a roux by adding flour to the fat and juices leftover in the roasting pan and add the leftover water from the boiled vegetables to create a thick, cloying glue-like substance. When I first discovered jus, I became pretty determined to learn how to make good stock. What’s great is that once you understand the basics, you can pretty much make any stock you want and tweak it according to your need or taste.

Stocks are referred to as either white or brown stocks. There is some debate as to what constitutes a white stock as opposed to a brown stock. Some refer to it in terms of the protein used, a white stock typically from white meats such as fish or poultry, while brown stocks from red meats. Others argue that the stocks are derived from the treatment of the ingredients, which are browned before adding water. Ultimately, a white or brown stock comes down to the colour you end up with.

A huge tip in making a brown stock is how you treat onion. For a brown stock, cut the onion in half and cook in a black pan, cut side down, peel and all, until blackened… yes, blackened!

In making a basic stock you are going to end up with a lot of sediment. To remove much of the larger sediment, strain your stock through muslin cloth. In my mind, every kitchen should have some muslin cloth. it is something you are going to need time and time again. You can find muslin cloth at the supermarket, or you can buy from Spotlight in Australia. I also like to leave my stock overnight in the refrigerator so that fat sets on the surface, which can then be easily removed with a spoon the next day. If you want to take this to another level, use a raft. A raft acts like magic, drawing the sediment to the uncooked protein, leaving you with a clear consomme’ … liquid gold!

Chicken Stock

Ingredients
  • 4 Chicken frames
  • 1 Large onion
  • 1 Celery head (the leafy part of the celery)
  • 2 Large carrots
  • 2 Bay leaves
  • 1tsp Peppercorns
  • Season to taste
Method

1. Cut celery head and carrots into chunks. Spread mirepoix evenly in baking tray, place chicken frames on top, and place in pre-heated oven at 180 degrees C. (350 degrees F.) until broowned.

2. Half onion (leave skin on), place cut side down in a black pan, cook on stove until cut side is blackened.

3. Add chicken frames, mirepoix and onion to large stockpot. Add bay leaves and peppercorns. Fill with water until ingredients are covered.

4. Bring to simmer, and allow to simmer for approximately 4 to 6 hours covered, until approximately half the liquid has evaporated.

5. Strain through colander into clean saucepan.

6. Leave to cool in refrigerator overnight.

7. Remove set fat with a spoon. Place over low heat on the stove until stock liquidises.

8. Strain stock through muslin cloth.

Chicken Consomme’

Ingredients
  • Chicken stock
  • 1 Large chicken breast
  • 1 Large carrot
  • 2 Celery sticks
  • 1 Medium onion
  • 6 Eggs (whites only)
Method

1. Add chicken breast to food processor and mince

2. Julienne carrot, celery and onion

3. Lightly whisk 6 egg whites, add mince and julienne vegetables and whisk together to form the raft mixture.

4. Add raft mixture to cold chicken stock and whisk together.

5. Slowly bring to simmer, gently stirring to make sure no raft has stuck to the saucepan bottom.

6. The raft will rise to the surface. Make hole in the centre of the raft to monitor progress of the consomme’. Extract liquid from the hole with a ladle and gently pour over raft to filter consomme’.

7. Once consomme’ is clear, strain through muslin cloth into clean saucepan.

Let’s get some clarity around Ice

Ok, so I’m a little excited about today’s post! Today, I’m going to explain how to make ice. Not just any kind of ice, but clear ice! I can hear some of you feigning excitement with a patronising “oh” right now. I know this is a topic I can get a bit obsessive about, like Harrison Ford in “The Mosquito Coast,” bringing ice to the natives. And I’m sure I’ve bored a few people in the past banging on about ice.

Nonetheless, clear ice is beautiful to look at and is far better quality than your standard ice. I think it can often be a discerning factor in determining the quality of a Cocktail Bar or Spirits Bar. Anyone can stock shelves with quality liquor, learn to make some popular cocktails, but it’s the attention to detail that matters. Why waste good spirits by dropping in sub-standard ice that will melt and dilute your expensive nip faster than you plan to sip it for. No, I’m looking for clear ice!

The ice we make in our freezers tends to be cloudy, and there are a few reasons for that. Firstly, freezers tend to freeze water quicker at lower temperatures. Supercooling has the effect of forming smaller and less transparent ice crystal structures. In addition, faster expansion of the water as it freezes can cause stress fractures in the ice. Finally, quickly freezing the water can trap air bubbles and impurities inside the ice.

The easiest way to manipulate ice formation in our home freezers is to make the ice using a cooler box. By using a cooler box as the container to form ice in, we achieve two things. Firstly, we insulate the water, keeping it closer to 0 degrees C. slowing down the freezing process; secondly, we control the direction of the freezing process, causing the water to freeze from the top down. This process also forces air bubbles and impurities to the bottom.

Some suggest that you boil the water you plan to make ice with to help remove impurities and air. One would hope the quality of your drinking water is better than that. Regardless, the importance of using hot water is that it helps slow the freezing process.

Clear Ice

Method

1. Fill a cooler box half way, with hot water.

2. Place in freezer, with lid off or open for 18 – 24 hours (you can get a sense of the thickness of the ice my the movement of air bubbles in the water below the ice)

3. Remove from freezer and allow to rest 5 minutes. Turn cooler upside down onto rack or board straddling sink. Allow to sit until ice slides out.

4. Chisel ice into desired size. To get straight lines I start the process using a serrated blade.

Chicken – It’s Cheap Cheap! How to Ease the Grocery Budget.

Let’s face it; we can all afford to save a few bucks!

I, for one, have not been a stranger to living on a tight budget in the past. As such, I have looked for ways to stretch the budget to get more value for money. The answer, chicken!

With meat being as expensive as it is these days, it can put a real dent in the grocery budget. Chicken is still reasonably priced! Well, at least it can be if you are smart about it. What’s more, chicken is such a versatile meat that can be prepared in so many different ways that it is not likely something that the family will grow bored of quickly.

You can get whole chickens at the Supermarket, sometimes less than $4.00 per kg, and break them down yourself. It’s pretty easy, and I’m going to show you how to do that today.

But I guess you’re asking, is it worth the trouble? I think so! Savings aside, it doesn’t take long to butcher a bird; you can prepare the cuts to your liking, save the frames to make stock, and the skin for making crispy chicken skin.

By butchering a whole bird yourself, you can save about 30-40%! For example, I brought four whole chickens, weighing 8.3 kg in total and costing me $32.50. From that, I was able to get 2.6kg of breast, 1.2kg of thigh, 1kg of wings, and 1.4kg of drumsticks. That would be at least $49.00 worth of meat if you were to buy that meat individually.

See how much I got! That’s $16.50 worth of savings, and I haven’t even counted the chicken frames I still have to make beautiful chicken stock.

Check out the video below to see how I broke down the chickens.

Bread & Butter Pudding – The poor mans pudding

Many years ago I was fortunate enough to take a master class with Marcus Moore when he was Executive Chef at Melbourne’s Sofital where he was awarded Three Chef Hats for Le Restaurant. Marcus had completed his formal training at The Dorchester Hotel in London under the tutelage of Michelin Star chef Anton Mosimann. I spoke with Marcus about his time at the Dorchester with particular interest surrounding Anton Mosimann’s signature dish, Bread and Butter Pudding. I grew up with Bread and Butter Pudding and was impressed that such a humble dessert could become one of the world’s great chef’s signature dishes.

The origins of Bread and Butter Pudding date back to the English Middle Ages. Frugal cooks of the 11th and 12th century looked for ways to make use of stale bread so that it would not go to waste. Back then, bread would be soaked in hot water, squeezed dry and sugar and spices added. In these times it was called “poor mans pudding.”

After the 13th century, cooks began to to use eggs, milk and a type of fat, and it become more commonly known as “Bread and Butter Pudding.”

There have been numerous variations of this humble dessert. The addition of raisins or apple, the use of brown sugar or maple syrup. Some include, chocolate, nuts, candied citrus peel, and all manner of sweet spices. There are even savoury versions using cheese and bacon.

Nothing I like more than a good ol’ fashioned Bread and Butter Pudding for dessert after a Sunday Roast. I love the soft and spongy texture with a rich, creamy custard with juicy sultanas soaked in sherry. It also works served cold for breakfast!

Bread & Butter Pudding

Ingredients
  • Loaf of toast sliced bread (not fresh)
  • Butter
  • 600ml Cream
  • 400ml Milk
  • 6 Large eggs
  • ½ cup Caster sugar
  • Vanilla Bean (1tsp Vanilla Bean Paste)
  • 1 cup Sultana’s
  • 60ml Sweet Sherry
  • 1 cup Apricot preserve
  • ½ cup Cointreau
Method

1. Add sultana’s and sherry to bowl, allow to soak for at least an hour

2. Add one whole egg and five yokes to mixing bowl, add sugar and whisk till lite and creamed.

3. Add cream, milk and vanilla bean/paste to saucepan, bring to simmer. Scrape out vanilla pod.

4. Slowly pour tempered cream into egg mix, gently whisking to combine, to make custard.

5. Layer baking dish with one layer of sliced bread, buttered on both sides, pour over enough custard to cover. Allow to stand for 10 minutes. Sprinkle half of the sultana’s over the bread layer.

6. Add another layer of bread buttered on one side, buttered side up. Pour over enough custard to cover. Allow to stand for 10 minutes. Sprinkle remaining sultana’s over the bread layer.

7. Add another layer of bread buttered on one side, buttered side up. Pour remaining custard over bread. (This may have to be done in batches to allow custard to soak into bread)

8. Add water to a second larger baking dish to form a bain marie, place pudding on wire rack in bain marie. Place in pre-heated oven at 180 degrees C. (350 degrees F.) for half-hour until bread starts to brown.

9. Add apricot preserve and Cointreau to saucepan. Whisk over low heat until texture is syrupy.

10. To serve, cut into squares and drizzle apricot glaze over pudding.

Lasagne and its ancient origins

Some of Italy’s most iconic dishes can attribute their origins to Ancient Greek cuisine. I have previously mentioned that the ancient Greeks made a cake called plakous, which may have been the forefather to pizza. I’m starting to sound like the father in “A Big Fat Greek Wedding” here, but the word Lasagne comes from the Greek word “laganon,“ meaning a wide flat sheet of pasta cut into strips.

It is important to remember that the Greek’s settled in Southern Italy around the 8th Century BC, and their influence of Greek culture spread with the conquest by the Romans of the region in the 2nd and 1st Centuries BC. In Roman cookery, the earliest existence of pasta was known as “lagane,” referring to sheets of fried flat dough, similar to laganon. The Roman poet Horace in the 1st Century AD makes reference to lagane in his works. Horace was no stranger to Hellenic tradition and studied at The Academy, founded by Plato, in Athens.

Some have suggested that modern Lasagne’s origins are actually British and reference The Forme of Cury, published in 1390, authored by the Master Cooks of King Richard II, as evidence.

Loseyns. XX II. IX.

Take gode broth and do in an erthen pot, take flour of payndemayn and make therof past with water. and make therof thynne foyles as paper with a roller, drye it harde and seeth it in broth take Chese ruayn grated and lay it in disshes with powdour douce. and lay theron loseyns isode as hoole as thou mizt. and above powdour and chese, and so twyse or thryse, & serue it forth.

However, this recipe can be attributed to an earlier 14th Century (ca. 1304-1314) cookbook Liber de Coquina penned by a Napolise author. Liber de Coquina describes a recipe for lagane whereby squares of pasta are boiled and layered with grated cheese and spices, including cardamom, nutmeg, pepper, and cinnamon.

Lasagne Alla Bolognese that we are familiar with today is traditionally made with pasta made with flour, eggs, and spinach, with a ragù sauce, béchamel, and cheese. It is a dish that started to appear in eateries in the Bologna region in the early 1800s.

While I do not use spinach pasta, I like to add a layer of blanched silverbeet or spinach to my Lasagna. What I think is really great about Lasagne is that I can portion out and freeze any leftovers for a quick and easy microwave dinner.

Pasta Dough

Ingredients
  • 140g ‘00’ Flour
  • 140g Semolina Flour
  • 6 large eggs
  • 1 tsp Salt
Method

1. Sift flour and salt into a mixing bowl.

2. Make well in flour and add 2 whole eggs and 4 egg yokes.

3. Combine mixture with a dough hook.

4. Turn mixture out onto a flat surface and knead until the dough has a smooth and elastic texture, similar to Play-Doh.

5. Cover dough in cling wrap and allow to rest for an hour.

6. Portion out dough, and roll out thin enough to feed through widest setting of the pasta roller. Laminate the pasta and fold four times on widest setting

7. Reduce roller width and continue to laminate until desired thickness. For Lasagne the final setting I use is ‘3’

Béchamel Sauce

Ingredients
  • 100g Butter
  • 110g Flour
  • 1lt Milk
  • ½ Onion
  • ½ tsp white pepper
  • ½ tsp salt
Method

1. Melt butter in saucepan one medium heat until foaming. Add flour, white pepper and salt and cook stirring for 1 to 2 minutes to create a roux.

2. Add milk and onion to saucepan and bring to a simmer.

3. Remove onion from milk and slowly add to roux, whisking until the mixture is smooth.

4. Return to heat, stir with wooden spoon until sauce thickens.

For Lasagne, once sauce thickens add 250g of grated mozzarella, and stir through until cheese has melted.

Lasagne

Assembly

1. In lasagne dish add thin layer of Bolognese Sauce.

2. Cover with a layer of pasta sheets, add thin layer of Bolognese Sauce (recipe for Bolognese found in recipe section), drizzle Béchamel Sauce, and sprinkle grated mozzarella. Repeat for three layers.

3. On top of third layer, spread layer of blanched silverbeet or spinach and drizzle Béchamel Sauce and sprinkle grated mozzarella.

4. Add layer of pasta, coat with Béchamel Sauce and sprinkle grated mozzarella.

5. Bake in oven at 180 degrees C (350 degrees F) for about 25 minutes until golden and bubbling.

Thai-style Pumpkin Soup

I was fortunate enough to have holidayed in Thailand early in 2020, right before the pandemic hit. It may well be the last overseas holiday I get to have in a very long time. I have always enjoyed Thai cuisine, and it’s complex balance of sour, sweet, bitter, salty, and spicy flavours. Unfortunately, our understanding of a particular cuisine at home is often driven by what is generally offered in local restaurants that have adapted recipes to our Westernised pallets. One of my greatest joys in travel is eating authentic cuisine that has not been tampered with to please another culture’s taste. Every dish I thought I knew suddenly seems monochrome by comparison to the real deal!

We can think of so many ingredients that we see as synonymous with Thai food; chilli, coriander, kaffir lime, but for me, the taste of authenticity is galangal! Galangal has a citrusy, sharp, and somewhat earthy woody undertone. Similar to ginger, galangal’s edible parts are its knobbly, orange-brown rhizomes. There was a time that fresh galangal was hard to find, and I’d have to take a hike to Victoria Market if I wanted some, and I’d freeze what I didn’t use for later. Fortunately, it’s a little more accessible these days, and I only have to nick up to the local Supermarket when I want fresh galangal.

Although pumpkin certainly isn’t a traditional Thai ingredient, it pairs wonderfully with so many different ingredients we would expect to find in Thai cooking. So why not try a Thai-style Pumpkin Soup? I hope my Thai friends approve.

Thai-style Pumpkin Soup

Ingredients
  • 1 kg Butternut pumpkin
  • 2 brown onion
  • 2 cloves of garlic
  • 3 tbls vegetable oil
  • 100g Thai red curry paste
  • 2 tbls fresh ginger, grated
  • 2 tbls fresh galangal, grated
  • 1 tbls lemongrass paste
  • 2 cups chicken stock
  • 1 lime, juiced
  • 400ml coconut milk
Method

1. Add sliced onions, minced garlic, and vegetable oil to stockpot, sweat until translucent.

2. Add red curry paste, grated ginger, grated galangal and lemongrass paste, combine.

3. Peel and de-seed Butternut pumpkin. Cut into chunks and add to stockpot, combine with other ingredients. Cover pot and allow to cook until soft. Stir regularly to ensure no sticking on the bottom of the stockpot. Maintain temperature at 140 to 165°C (285-330°F) (Can be tested with thermometer).

4. Gently mash pumpkin in the stockpot. Add chicken stock and lime juice. Simmer for 30 minutes.

5. Blend pumpkin mixture in batches. For a smoother texture, use an upright blender rather than a stick blender.

6. Return blended soup to a pot, add coconut milk and simmer over low heat. Season to taste.

The soup pictured here is garnished with Garlic Chilli Prawns, coriander, and Crispy Prawn Head.

Back to the ’70s – Apricot Chicken

WARNING the following post contains a graphic image of retro cooking and may be disturbing to some foodies.

With everything going on in the world today, it is easy to reminisce about simpler times. I was a child of the ’70s. It was not a decade without its own share of drama, with social change and the Vietnam War. Although, as children, we were, for the most part, sheltered from all of that. We were oblivious to what was happening in the world around us while we watched The Brady Bunch, Hey Hey Its Saturday, and Countdown on our black and white TVs. We didn’t have Playstation and Xbox, we had Atari, and it only played one game, Pong! We didn’t have the internet, mobile phones, and Netflix. We played outside and entertained ourselves. We got bumps and bruises, cuts and scratches, and the odd broken limb falling off playground equipment that probably wouldn’t meet safety standards today, but we survived!

The 1970s also reflected a culinary revolution in Australia. The Australian Woman’s Weekly Cookbook, launched in 1970, introduced us to International cuisine. We saw the opening of fast-food chains; McDonalds, Hungry Jack’s (Burger King), and Pizza Hut. We drank Big M’s and ate Jubilees.

Breville released kitchen equipment like the Kitchen Wizz food processor and the Snack’n’Sandwich toaster. The latter was a particular favourite of my Dad’s. He would fumble about, trying to keep baked beans on the bread with his dirty hands, discussing the virtues of this wonderful toaster. This also denotes Dad’s second culinary idea, to start a Toastie food van (a really disgusting thought if you saw him making a toastie). But like his thought to open a McDonalds, Mum was quick to tell him it was a stupid idea (probably a good call on this occasion.)

Fine dining took off in Melbourne with the relaxing of liquor laws in the ’70s. We saw the opening of iconic restaurants like Mietta’s (Mietta O’Donnell), Stephanies’s (Stephanie Alexander), Lynch’s (Paul Lynch), and the Flower Drum (Gilbert Lau) to name a few.

Dishes like Cheese Fondue, Prawn Cocktails, Oyster Kilpatrick, Lobster Mornay, Beef Wellington, Chicken Kiev and Bombe Alaska were all the rage at dinner parties. But there is one retro dish that I still like to make from time to time: Apricot Chicken. The Apricot Chicken we know today possibly originated with the Lipton Company as another use for its dried soup mix, which was initially produced in the USA in 1952.

This has to be one of the simplest dishes you can make and super quick to prepare. So crank up the ABBA for a bit of mood music, and let’s go back to the ’70s!

Apricot Chicken

Ingredients
  • 2kg of Chicken pieces
  • 2 pkts Continental French Onion Soup
  • 2 400ml tins of Apricot Nectar
Method

1. Place Chicken pieces in a baking tray

2. Sprinkle Continental French Onion Soup over the chicken

3. Pour Apricot Nectar over the Chicken

4. Place in pre-heated oven at 180 degrees C. (350 degrees F.) for about an hour turning Chicken until caramelised.

Southern Fried Chicken or should it be called McChicken?

Good things come to those that wait, and Southern Fried Chicken is no exception to that rule. It’s not that making Southern Fried Chicken is so much time-consuming as it is about patience. If you want succulent chicken with crispy breading, you will need to get organised and be patient. Sure, you can take a lot of shortcuts, but the results will not be the same. If you want to do this right, you need to start preparation 24 hours before beginning frying. Why so long? Because you want to give the chicken plenty of time to marinate in the buttermilk brine and then time for the breading to become tacky. You need to fry the chicken in small batches so that the oil keeps its temperature, and if you really want to go that extra mile, you will fry the chicken twice, Korean style. All of this takes time!

When we think of fried chicken in Australia, I believe it would be fair to say that most of us think of KFC and its 11 secret herbs and spices. The first Australian KFC opened in 1968 at Guildford, NSW, and was the first fast-food franchise in Australia. My earliest childhood memory of fast food was eating a KFC meal in the back of my Dad’s Ford Falcon station wagon, which I had won in some competition. I must have only been about 5 years old at the time.

I don’t recall how I won it. Still, I can remember receiving a telephone call from a KFC representative to give me the exciting news that I was a winner. It was actually the earliest telephone call I can remember getting as well! Could you imagine getting a personal telephone call to give you the exciting news that you had won a Two-Piece Feed today?

I still indulge in KFC from time to time, albeit, these days, I prefer it cold. I think most of us are guilty of asking for extra chicken salt on our chips or engaging in the bizarre ritual of using the potato and gravy as a condiment.

In the USA, Fried Chicken has its roots in the deep south and is not so much associated with some confederate like Colonel. (Colonel Sanders, by the way, did not earn a military title, but rather the title of Colonel was bestowed on Harland Sanders by the Governor of Kentucky.) Fried chicken is often recognised as an iconic African slave dish. We owe the fried chicken we have come to love today to African slaves, who used seasoning techniques popular in West African cooking. However, the frying of chicken was introduced by Scottish immigrants who settled in the southern states in the late 1700s’. ‘The Art of Cookery Made Plain and Easy,’ a British cookbook published in 1747, describes a recipe for Fried Chicken. As such, perhaps McDonald’s McChicken is the more historically apt name?

I’m rather partial to a Chicken Burger using Southern Fried Chicken. So I’ve made up a batch of fried chicken thighs to grace my burger, using this KFC style recipe.

Southern Fried Chicken

Ingredients

Marinate

  • 1 cup buttermilk
  • ½ cup hot sauce
  • 1 tbsp salt
  • 1 egg

Chicken Breading

  • 1 ½ cups plain flour
  • 1 ½ cup corn flour
  • 1 ½ tbls baking powder
  • 3 tsp salt
  • ¾ tsp celery salt
  • 1 tbls black pepper
  • 1 tbls white pepper
  • 1.5 tsp sweet paprika
  • ½ tsp cayenne pepper
  • 1.5 tsp onion powder
  • 3 tsp garlic powder
  • 1 tsp mustard powder
  • 3/4 tsp ginger powder
  • 1.5 tsp dried thyme
  • 1.5 tsp dried basil
  • 1.5 tsp dried oregano

To Fry

  • 1.5 – 2 litres canola oil
Method

1. Mix buttermilk, hot sauce, salt and egg in a large bowl. Add chicken pieces, cover and refrigerate for at least 2 hours (ideally overnight)

2. Remove chicken pieces from marinate, allow to drain on rack for 10 minutes and pat dry excess moisture with paper towel

3. Add all ingredients for breading mixture into a large bowl and combine. Pour mixture into a resealable plastic bag, add a chicken piece, and shake gently. Shake off excess dredging, ensuring that the chicken is evenly coated.

4. Place breaded chicken on a rack, allow to sit in uncovered in the refrigerator for at least 10 minutes or until dredging is tacky.

5. Remove from refrigerator and allow chicken to return to room temperature before frying.

6. Bring oil to temperature, and fry chicken in batches at about 150 – 160 degrees C. (300–325 degrees F.)

7. Remove chicken from oil and rest on rack.

Chicken Fillet Burger

1. Half hamburger buns (Recipe for buns can be found under Bakery recipes) and lightly toast the cut side under grill

2. On the bottom roll, place 2 Fried Chicken fillets, top with crisp iceberg lettuce, and mayonnaise. Place other half of roll on top… enjoy!